
Monday 11 November 2013
Thursday 10 October 2013
Ad exchange
Ad exchanges are technology platforms that facilitate the bided buying and
selling of online media advertising inventory from multiple ad networks

The Double-click Ad Exchange is
a real-time marketplace to buy and sell display advertising space. By
establishing an open marketplace where prices are set in a real-time auction,
the Ad Exchange enables display ads and ad space to be allocated much more
efficiently and easily across the web. It’s just like a stock exchange, which
enables stocks to be traded in an open way.
Who
participates in the Ad Exchange?
Again, imagine the Ad Exchange
as a stock exchange. Only the largest brokerage houses actually plug into, say,
the NYSE. In the Ad
Exchange world, those are:
1. The
large online publishers (sellers)—websites like portals, entertainment sites
and news sites
2. Ad
networks and agency holding companies that operate networks (buyers)—companies
that connect web sites with advertisers.
But it’s not just the direct
participants who benefit. As an individual investor, you can buy and sell
shares on the stock exchange through an online broker, without needing to plug
in to the NYSE mainframe. It’s the same for AdWords advertisers and AdSense
publishers who get access to the extra publishers and certified ad networks in
the Ad Exchange, through their AdWords or AdSense interface. Similarly,
advertisers who use other participating ad networks can get the benefits of the
Ad Exchange.
What
does the Ad Exchange mean for the display advertising ecosystem?
Sellers
in the Ad Exchange:
1. Can make the most money for their
ad space, every time a page on their site loads with an ad (called an
“impression”). In the past, too many sellers had inventory unsold or sold for a
price below its potential market value.
2. Get
access to many more advertisers, while still being able to control who can
advertise on their site.
3. Benefit
from simplified reporting and payments—a single exchange manages it all.
Buyers
in the Ad Exchange:
1. Get
access to many more websites and more ad space.
2. Can
use technology that allows them to bid for ad space in real time, depending on
how much they value a particular ad impression.
3. Have
more controls over where their ads run and don’t run.
Google AdWords advertisers:
1. Have
easy access to the websites in the Ad Exchange, as well as all the existing
websites in the Google Content Network—all through their AdWords interface.
Google AdSense publishers:
Have their ad space available
to certified ad networks in the Ad Exchange. This means more quality display
advertisers competing for their ad space and higher returns. AdSense publishers
get the benefit of this through their AdSense interface, without having to log
in to the Ad Exchange itself.

Tuesday 8 October 2013
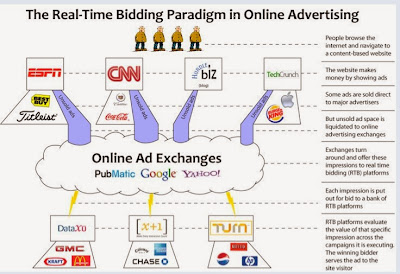
Real Time Bidding (RTB) – what it means in the world of digital media and how it works.
RTB as a relatively new method of selling and buying online display advertising in real time, one ad impression at a time. Sounds a little confusing? In absolute layman’s terms, it simply means that it is a platform that allows advertisers to bid for the right to advertise on a given web page that is being opened up at any given time by any given individual.
RTB is the valuation and bidding on individual impressions in real time. The buying takes place over online media exchanges – basically media marketplaces – which connect sellers (publishers) and buyers (advertisers

Basically, it is an individual-targeted module of advertising.
How does it work?
In ancient times (by that I mean, about 5 years ago!), if Mr. A opened a web page, he would be bombarded with advertisements ranging from air tickets to curtain rods. Now Mr. A is neither interested in air tickets nor in curtain rods. So what does he do? He simply ignores those ads and goes about his business. What he is really interested in is real estate, and should an ad pertaining to that pop up, I am sure he will enthusiastically click on the ad link to find out more.
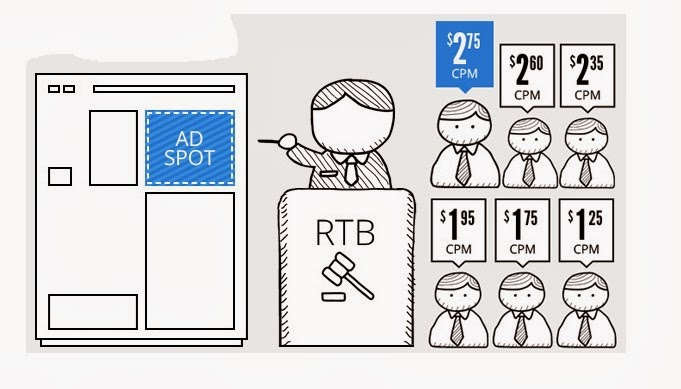
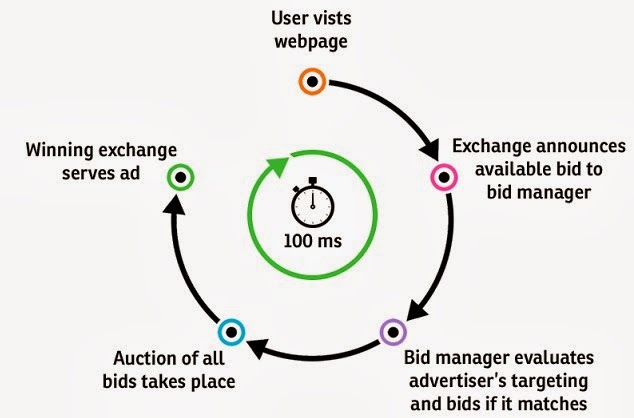
Now-a-days, an individual’s browsing history or tracking cookies is noted to form a picture of the person’s interests. So the next time this person opens a web page, an intense bidding war happens behind the scenes for the advertising space on that particular web page. The highest bidder wins and gets the chance to catch the attention of the unsuspecting browser. Of course all of this happens in absolute nano seconds and this process is repeated for every ad space on every page he/she opens.
How real time bidding works and who is involved ???.

Real-time bidding (real time advertising): a method of buying online display advertising in which publishers release impressions to be purchased individually, in an auction environment.
Ad networks: an entity that connects buyers and sellers of online advertising impressions. These companies can facilitate the purchasing of real time ad inventory.
Demand side platform (dsp): these entities allow advertisers to manage their purchasing of online display advertising in real-time. DSPs purchase advertising for the advertisers through ad networks and exchanges. DSP functionality varies, and includes things like allowing advertisers to manage their bid amounts, performance metrics and consumer targeting.
Online display advertising (online banner ads): online advertising that appears on top of or alongside the content of a webpage. This type of advertising utilizes banners which come in the standard sizes of 300×250, 728×90 and 160×600.
Targeted advertising: a form of advertising in which ads are delivered to consumers based on demographics and geography, as well as other factors like interests and purchasing behaviour. Real time bidding has enabled online display advertising to become more targeted through the use of first and third party data.
Online contextual advertising: online advertising which is selected to appear on a particular webpage because it is a match for the content of the page.
Behavioral marketing (behavioural targeting): this term refers to several ways in which online advertising campaigns are made more effective by taking into consideration the actions of the consumer. Data needs to be collected to facilitate this process, and what is collected will vary based on the desires of the advertisers.
Supply Side Platform (SSP): an entity that works with publishers and advertisers to release impressions into the real time bidding ecosystem to be purchased by DSPs or other agents.
Second Price Auction: an auction format in which the bidder who offers to pay the highest price pays only the price of the second highest bidder. This system is used in most RTB ecosystems.
Cookie Caching: collecting the cookies of visitors to a webpage for the purpose of making more informed buying decisions about that consumer’s impression.
Retargeting: the process of adjusting your online advertising creative, as well as purchasing strategy, based on the actions of consumers. The simplest example is spending more for the impressions of consumers who have not completed an order form on your website, as well as showing them a more influential creative.
Tagging a Page: the process of adding a piece of code (referred to as a ‘pixel’) to a webpage (usually the landing page and key pages for a campaign) which collect data on the visitors to those pages. This data is then used to make more informed buying decisions later on.
Ad Server: a technology used to store online display ads, then subsequently deliver them to a consumer on a website. This company’s purpose is to maximize revenue for the publisher and/or advertiser, as well as manage campaigns.
Brand Safety Technology: this technology is used to classify the content of webpages and to allow advertisers to avoid running their campaigns on pages which carry content they deem to be ‘negative’ for their brand.
Prospecting: the process through which an RTB campaign is implemented so that promising consumers are sought out so that they can be retargeted throughout the campaign.


How to Setup Google DFP for Selling Ads
Consider
the following scenarios:
·
You use an advertising
network like Google Adsense for serving ads on your website but would also like
to accept ad campaigns from brands, digital agencies and other direct
advertisers.
·
You have partnered with
multiple CPM based ad networks – say Adsense, BuySellAds, Tribal Fusion, etc. –
but would only like to run ads from the network that pays you the most money
(or maximum CPM)
·
You would like to display
ads based on certain criteria. For instance, visitors from U.S. are shown one
set of ads while visitors who are in India and use Windows are targeted with a
different set of ads.
·
You are using Adsense
across your website and the CPMs may vary. Instead of serving low-cost Google
AdSense ads, say when the CPM is less than $1, you would like to display
in-house ads that promote your older article or your other website.
Google DFP, or Double-click
for Publishers, is a perfect solution in either of the above scenarios. DFP is
a free ad server from Google that lets you sell ad space on your website more
effectively and also helps maximize your advertising revenue.
Sell Your Advertising Space with Google DFP
Say you have a blog where you
cover a variety of topics including technology, sports and entertainment. An
advertiser wants to serve banner ad campaigns on all your tech related pages.
As part of the deal, he has agreed to pay $20 CPM for all US impressions and
you can fill your remnant inventory through Google AdSense ads.
Let’s see how we can easily setup
such an ad campaign through Google DFP.
Step 1: Create Ad Units
We need to tell DFP about all the advertising
spaces on our web pages. For this example, we’ll create three ad units – the
300×250 rectangle, the 160×600 skyscraper and the 468×60 banner. These are
standard IAB units though you can define custom ad sizes as well.
Go to DFP –> Inventory –> Ad
Units –> New Ad Unit (choose Web or Mobile). Give your ad unit a descriptive
name so that you can easily determine where that ad unit will be displayed and
also include the size of that unit. You may check the option “Maximize revenue
of unsold and remnant inventory with AdSense” in case you wish to display
Google Ads when there are no direct ads or when Google is offering better CPM
than the direct advertiser.

Bonus Tip: If you set the target windows in the Ad Unit
as “_blank”, the ads will open in a new window. Google doesn't allow you to
open AdSense ads in a new window but if you are using DFP, AdSense ads can be
configured to open in a new window without breaking the AdSense program
policies.
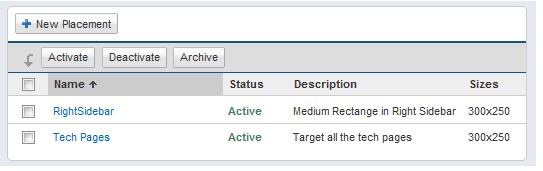
Step 2: Define Placements
You have multiple ad units on the
website and there’s a possibility that an advertiser may want to target one or
more of these ad units. For instance, an advertiser may want to target your
Medium Rectangle and Skyscraper ad units on tech-related pages of the site. You
can group these ad units into a placement that can be targeted by advertisers.
Go to the Inventory tab –> Placements –> New Placement and
add your placement. To keep things simple, we will associate only one ad unit
(300×250) with our ad placement. Check the option that says “Offer this
placement to advertisers” through AdWords to attract
more advertisers. You should carefully fill the AdSense targeting section for
that placement since whatever you write here will be viewable by AdWords
advertisers.

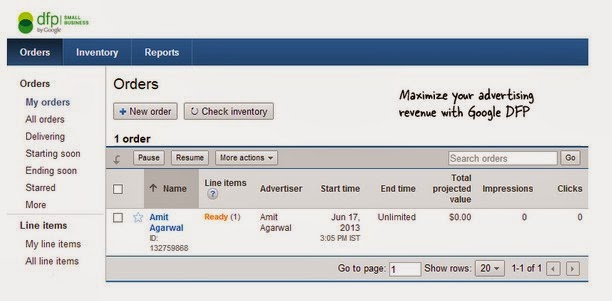
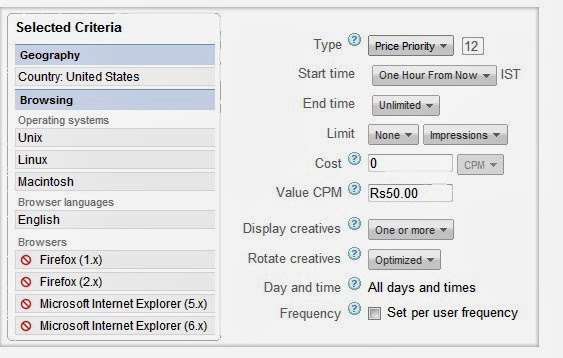
Step 3. Create an Order
Now that we have defined our ad
inventory, it’s time to create the client’s order (or campaign). The client
/advertiser will specify where he wants to place the ad, what kind of
demographics he wants to target, what the price he is willing to pay is and how
long the campaign will run on the website.
Go to DFP –> Orders –> New
Order. Create a company for the advertiser and then fill-in the order details
under “New Line Item.” Set the Type to “Price Priority” if you want the highest
paying ads to be served on your site. Set Value CPM equal to the price that the
client will pay and then add the targeting criteria.
Also see: Increase AdSense Revenue with
Google DFP
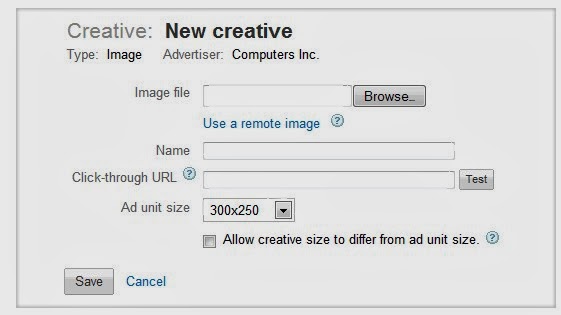
Step 4. Upload the Ad Creative
Next you have to upload the ad
creative that will display on your web pages. You can either upload images,
Flash videos or even snippets of HTML and JavaScript in case you’re going with
text ads.
Go to DFP – > Line Items and
select the “Line Item” that you’ve created in the previous step. Click Add Creative’s
and either upload the image / SWF Flash file or choose the Text Ad format to
enter a text-on ad (like the one you see on Google search pages).
You can even upload multiple
creative ads per line item and they’ll display evenly across the site – you can
compare the click-through rates of these creative’s to determine the ad copy
that performs best with your visitors.
Step 5. Get the Ad Tags for your Site
We’ll grab the JavaScript code from DFP and copy-paste it into our website
/blog template.
Click the Inventory tab in your DFP dashboard and choose
“Generate Tags” – select the appropriate ad unit (the one you created in Step
#1) and choose “Generate Tags.” Use the Google Publisher Tag (asynchronous) option from the drop-down and add this
code to your website. Google DFP should begin serving ads on your pages in the
next 10-15 minutes.
Wednesday 4 September 2013
Managing cookies part-2
What can I do to manage cookies stored on my computer?
Different browsers offer differing ways to configure your browser's
cookie settings.
Due to the wide range of differences among differing
websites' privacy policies, many browsers allow for universal privacy settings
which users can choose from.
Users choose differing privacy settings based on their
differing privacy concerns. Most commercial and/or professionally-created
websites like Yahoo and Google have privacy
policy pages that disclose how the sites handle, gather, and/or pass on user
information to third parties. These are known as “P3P” features (Privacy
Preferences Platform).
Some modern browsers have a feature that will analyze website
privacy policies and allow a user to control their privacy needs. These are
known as "P3P" features (Privacy Preferences Platform). Get more
information on P3P.
If the commercial website you are visiting lacks a privacy
policy, be very careful with any information you enter into any forms within
the site.
You can easily remove any cookies that have been created in the
cookie folder of your browser. For example, if you are on Windows machine, here
are the steps on how to use Windows Explorer to erase cookie files:
* Click on 'Windows Explorer'
* Select the 'Search' button on the tool bar
* Enter “cookie” into the search box field for 'Folders and Files'
* Choose 'My Computer' in the 'Look In' drop down menu
* Click on 'Search Now'
* Select and open the folders that are retrieved
* Click to highlight any cookie file
* Click the 'Delete' key to erase the cookie file
If you don't have Windows Explorer, click the “Help”
function on your “Start” button and enter “cookies” to search for information
on how to locate the folder.
There are a number of ways to manage cookies. You can clear
cookies, prevent cookies, delete cookies and enable cookies at your will and
for different circumstances. If you use different computers in different
locations you will need to ensure that each browser is adjusted to suit your
cookie preferences
If you are using Firefox 2.0+ / 3.0+ / 4.0+/ to
disable cookies:
a)
Go to 'Tools' in the menu
bar
b)
Click on 'Options'
c)
Click on 'Privacy Tab'
d)
Disable the box that says
'Accept Cookies From sites'
To clear existing cookies:
a)
Go to 'Tools' in the menu
bar
b)
Click on 'Options'
c)
Click on 'Privacy Tab'
d)
Click on "Clear
Now"
e)
Select "Cookies"
f)
Click on "Clear
Private Data Now"
This procedure will stop sites from installing cookies on
your Firefox browser.
If you are using Google Chrome to disable
cookies:
a)
Go to 'Tools Menu'
b)
Click on 'Options'
c)
Click on 'Under the Hood'
d)
'Cookie Setting' should be
selected. Once done select 'Block all Cookies'
e)
Now all cookies should be
blocked on your Google Chrome
To clear existing cookies:
a)
Go to 'Tools Menu'
b)
Click on 'Options'
c)
Click on 'Under the Hood'
d)
Under 'Privacy' section
select "Show Cookies'
e)
A new window should open
called 'Cookies' In here you can see all the cookies within your Google Chrome
Browser.
f)
Click on "Remove
All" to remove all traces of cookies
g)
If you wish to only remove
a certain cookie, simply highlight and click "Remove"
Managing Cookies part-1
What is an Opt-Out cookie?
Opt-out cookies are cookies created by a website on your
browser folder that enables you to block that same website from installing
future cookies. The opt-out cookie tells the website not to install third party
advertiser or other cookies on your browser. This prevents the third party ad
server from tracking your page preferences within a website or among websites
within their network. The drawback to using opt-out cookies is that they are
site specific. They can only block cookies from a specific server and won't
block cookies from other websites. To do generalize blocking, you can manage your cookies via your browser's cookie
settings.
Many of the biggest third party ad serving companies offers
opt-out cookies to users.
What is an Opt-Out cookie?
These are essentially cookies used to avoid cookies.
Accepting an opt-out cookie blocks future cookies being installed on your
browser by a particular website server or advertiser. It essentially lets you
declare that you do not wish to participate in targeted ad delivery, profiling
or otherwise have your web browsing tracked. An opt-out cookie will only block
cookies from a particular server and is not a generic tool to block cookies
from any site you visit. However, you can manage cookies via
your browser settings.
The major third party ad serving companies offer web users
the ability to accept an opt-out cookie.
What is a cookie profiling?
Cookie profiling, also called web profiling, is the use of
persistent or permanent cookies to track a user’s overall activity online. This
tracking does not just happen when you are on a particular site, but it occurs
the whole time you are browsing. This kind of profiling activity is often done
by marketers who buy advertising rights on thousands of popular websites in
order to collect and collate cookie information and create a single “profile”
of a user. Internet advertising, as it is called, targets potential customers
based on the manner they browse the Internet. This is the very reason why most
websites flash banner ads on their pages. This matter may not be a big deal for
some, but others take their privacy seriously and are uneasy about being
“followed around” and profiled.
Why do cookie profiling?
Cookie profiling is the only way for marketers to target potential customers and obtain a possible product purchase from them. By knowing a user’s browsing habits, including sites visited, age, marital status, and political and religious affiliations, they can show him or her advertisements that are appealing, advertisements that he or she will care to patronize. This is a certain way for marketers to increase their profit by widening their customer base.
How is cookie profiling done?
Websites store cookies by automatically storing a text file containing encrypted data on a user’s machine or browser the moment he or she lands on a page online. Whether it is a permanent or a temporary cookie, the idea is to create a “log” of the user to facilitate future visits to the said site. When these cookies are collected to create a certain idea about a user, that is called cookie profiling, or web profiling. Collated data may include browsing habits, demographic data, and statistical information, which are what marketers are after in order to mark a user. Cookie profiling is performed by advertisers, but the cookies they need to create these profiles are obtained from several online sources, mostly from administrators of popular sites receiving millions of traffic monthly. These administrators collect cookie data and offer them to marketers for extra profit.
Implications of cookie profiling.
Cookie profiling is an advantage for marketers because it empowers them on their advertising efforts. The more users are targeted based on the products they like, the higher the chance they will make a purchase. Additionally, cookie profiling can be used maliciously, for instance, stalking on certain individuals in order to victimize them. Cookies can also help solve crimes, especially now that Internet crimes are becoming rampant. In fact, many governments are using social networking sites to track online criminals, and some of them are being caught using information contained in cookies.
Although you cannot prevent people from creating a profile of you using cookies, you can still protect your privacy in several ways. There are several free programs you can utilize to identify companies trying to store cookies on your machine, or programs you can use to delete hidden cookies on your system. Ghostery is a free add-on you can install on your browser; it detects cookies from 500 companies trying to spy on you, gives you background information about them, and let you block those cookies whenever you want. To build an impenetrable privacy wall, you can install session and cookie cleaners, such as CCleaner, on your computer and schedule them to clear your browser and machine from these privacy bugs. Another way is to configure your browser to prohibit accepting cookies from untrusted sites
OVERVIEW OF COOKIES
What is a cookie?
Cookies are usually small text files, given ID tags that are
stored on your computer's browser directory or program data subfolders. Cookies
are created when you use your browser to visit a website that uses cookies to
keep track of your movements within the site, help you resume where you left
off, remember your registered login, theme selection, preferences, and other
customization functions. The website stores a corresponding file(with same ID
tag)to the one they set in your browser and in this file they can track and
keep information on your movements within the site and any information you may
have voluntarily given while visiting the website, such as email address.
Cookies are often indispensable for websites that have huge
databases, need logins, have customizable themes, other advanced features.
Cookies usually don't contain much information except for the
url of the website that created the cookie, the duration of the cookie's
abilities and effects, and a random number. Due to the little amount of
information a cookie contains, it usually cannot be used to reveal your
identity or personally identifying information. However, marketing is becoming
increasingly sophisticated and cookies in some cases can be aggressively used
to create a profile of your surfing habits.
There are two different types of cookies:
Session cookies -
these are temporary and are erased when you close your browser at
the end of your surfing session. The next time you visit that particular site
it will not recognize you and will treat you as a completely new visitor as
there is nothing in your browser to let the site know that you have visited
before.
Persistent cookies -
these remain on your hard drive until you erase them or they expire. How long a
cookie remains on your browser depends on how long the visited website has
programmed the cookie to last.
Monday 19 August 2013
How to Setup Google DFP for Selling Ads
How to Setup Google DFP for Selling Ads
Consider
the following scenarios:
·
You use an advertising
network like Google AdSense for serving ads on your website but would also like
to accept ad campaigns from brands, digital agencies and other direct
advertisers.
·
You have partnered with
multiple CPM based ad networks – say AdSense, BuySellAds, TribalFusion, etc. –
but would only like to run ads from the network that pays you the most money
(or maximum CPM)
·
You would like to display
ads based on certain criteria. For instance, visitors from U.S. are shown one
set of ads while visitors who are in India and use Windows are targeted with a
different set of ads.
·
You are using AdSense
across your website and the CPMs may vary. Instead of serving low-cost Google
AdSense ads, say when the CPM is less than $1, you would like to display
in-house ads that promote your older article or your other website.
Google DFP, or DoubleClick for Publishers, is a
perfect solution in either of the above scenarios. DFP is a free ad server from
Google that lets you sell ad space on your website more effectively and also
helps maximize your advertising revenue.

With
DFP, you may run standard banner ads, text ads (JavaScript based) or even
rich-media campaigns that use video and Flash creatives. The tool, which was
formerly known as Google Ad Manager, requires no downloads or installation and
any website publisher can sign-up for the DFP program as long as they have an
active Google AdSense account.
Sell Your Advertising Space with Google DFP
Say you
have a blog where you cover a variety of topics including technology, sports
and entertainment. An advertiser wants to serve banner ad campaigns on all your
tech related pages. As part of the deal, he has agreed to pay $20 CPM for all
US impressions and you can fill your remnant inventory through Google AdSense
ads.
Let’s
see how we can easily setup such an ad campaign through Google DFP.
Step 1: Create Ad Units
We need
to tell DFP about all the advertising spaces on our web pages. For this
example, we’ll create three ad units – the 300×250 rectangle, the 160×600
skyscraper and the 468×60 banner. These are standard IAB units though you can
define custom ad sizes as well.
Go to
DFP –> Inventory –> Ad Units –> New Ad Unit (choose Web or Mobile).
Give your ad unit a descriptive name so that you can easily determine where
that ad unit will be displayed and also include the size of that unit. You may
check the option “Maximize revenue of unsold and remnant inventory with
AdSense” in case you wish to display Google Ads when there are no direct ads or
when Google is offering better CPM than the direct advertiser.

Bonus Tip: If
you set the target windows in the Ad Unit as “_blank”, the ads will open in a
new window. Google doesn't allow you to open AdSense ads in a new window but if
you are using DFP, AdSense ads can be configured to open in a new window
without breaking the AdSense program policies.
Step 2: Define Placements
You
have multiple ad units on the website and there’s a possibility that an
advertiser may want to target one or more of these ad units. For instance, an
advertiser may want to target your Medium Rectangle and Skyscraper ad units on
tech-related pages of the site. You can group these ad units into a placement
that can be targeted by advertisers.
Go to the Inventory tab –> Placements –> New Placement and
add your placement. To keep things simple, we will associate only one ad unit
(300×250) with our ad placement. Check the option that says “Offer this
placement to advertisers” through AdWords to attract more advertisers.
You should carefully fill the AdSense targeting section for that placement
since whatever you write here will be viewable by AdWords advertisers.
Step 3. Create an Order
Now
that we have defined our ad inventory, it’s time to create the client’s order
(or campaign). The client /advertiser will specify where he wants to place the
ad, what kind of demographics he wants to target, what’s the price he is
willing to pay and how long will the campaign run on the website.
Go to
DFP –> Orders –> New Order. Create a company for the advertiser and then
fill-in the order details under “New Line Item.” Set the Type to “Price
Priority” if you want the highest paying ads to be served on your site. Set
Value CPM equal to the price that the client will pay and then add the targeting
criteria.

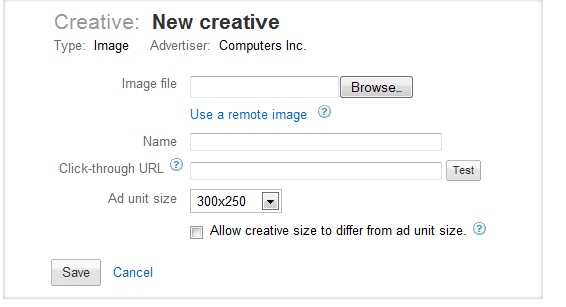
Step 4. Upload the Ad
Creative
Next
you have to upload the ad creative that will display on your web pages. You can
either upload images, Flash videos or even snippets of HTML and JavaScript in
case you’re going with text ads.
Go to
DFP – > Line Items and select the “Line Item” that you've created in the
previous step. Click Add Creatives and either upload the image / SWF Flash file
or choose the Text Ad format to enter a text-on ad (like the one you see on
Google search pages).
You can
even upload multiple creative ads per line item and they’ll display evenly
across the site – you can compare the click-through rates of these creatives to
determine the ad copy that performs best with your visitors.
Step 5. Get the Ad Tags
for your Site
We’ll grab the JavaScript code from Google Ad Manager DFP and
copy-paste it into our website /blog template.
Click the Inventory tab in your DFP dashboard and choose
“Generate Tags” – select the appropriate ad unit (the one you created in Step
#1) and choose “Generate Tags.” Use the Google
Publisher Tag (asynchronous) option
from the drop-down and add this code to your website. Google DFP should begin
serving ads on your pages in the next 10-15 minutes.
If you ever have trouble serving ads through DFP , just open any
page of your website, add ?google_debug to the
URL and reload. This will generate a tracing log that should help you debug the
problem, if any.
Subscribe to:
Posts (Atom)
Change to AdWords Enhanced CPC removes bid cap to account for location & audience
AdWords users will notice a new alert in their accounts notifying them of changes to Enhanced CPC bidding. The notice...

-
Macros Insertion What ‘s the next step when you get a a new type of third party tag , definitely it’s inserting of the macros in the cod...
-
What is an Opt-Out cookie? Opt-out cookies are cookies created by a website on your browser folder that enables you to block that same...
-
Standard Ad Sizes Why do we need any standards in sizes ,I think it would be so great if we create any size of Ad that we feel like, jus...

